Blog Post

DevOps - Tools - Cmder

Roger Taylor • March 3, 2019

Installing & configuring Cmder on Windows 10

Overview

Cmder is an awesome console emulator package for Windows, an essential tool for starting your DevOps journey on the Windows Platform.

In this blog post join me for a step by step Installation and Configuration of Cmder console emulator, with a few configurations that I like to do to setup my environment when using this tool.

Download Cmder for Windows 10

1.Open up your browser enter the following URL below:

https://cmder.net/

2. On the home page scroll down to the Download Section

Download section on Home page

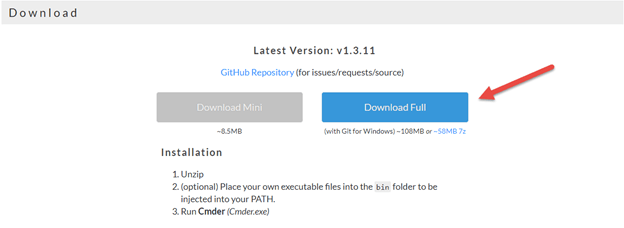
3.Select Download Full button

Once the zip file cmder.zip is downloaded

Download Folder

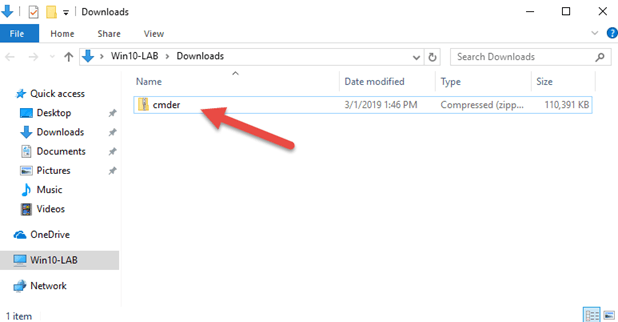
4.Cut and place the cmder.zip file in destination folder - C:\DevOps\Apps

Note - this is just a personal preference for my lab environment, you can unzip the file to your preferred folder path.

To keep things functional placing all my DevOps Tool exe’s in the C:\DevOps\Apps\[Application] path makes it easy to back up everything and restore quickly to another machine.

Installing Cmder

Now that we have the cmder.zip file downloaded and moved over the C:\DevOps\Apps folder

Extract the console emulator package from the cmder.zip file

5.Right click on the cmder.zip file using the default zip extract with Windows 10 and click the Extract button

Extract Compressed Zipped File

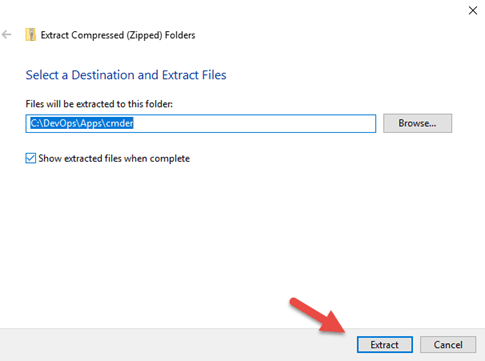
Cmder is now installed in the following folder below:
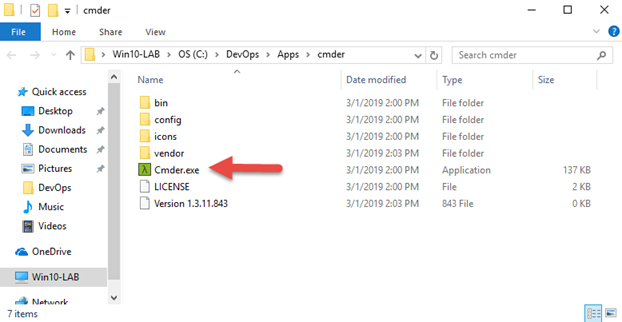
Configuring cmder

Now the last part of the Installation and base Configuration for the Cmder console emulator tool, is to add the cmder.exe folder path to Computer’s Systems Environment Variable path


6.Select Win10-LAB Computer on the Desktop, right click select Properties


Computer Properties Window

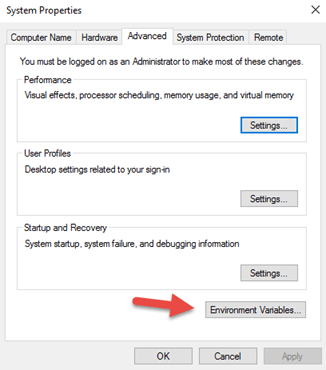
7.Then select Advance system settings

From the System Properties windows

8.Select Environment Variables button


Properties Window

On the Environment Variables window

9.Select Path in the System Variables area, then select the Edit button

Environment Variables Window

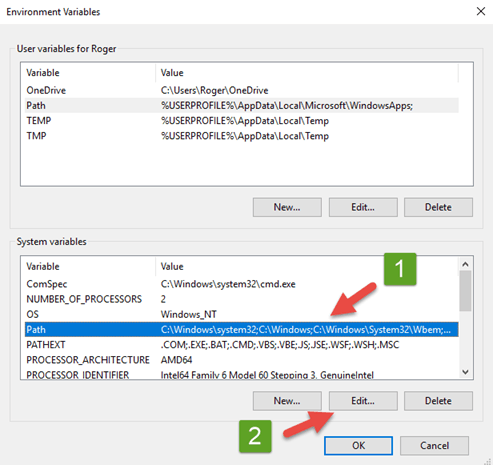
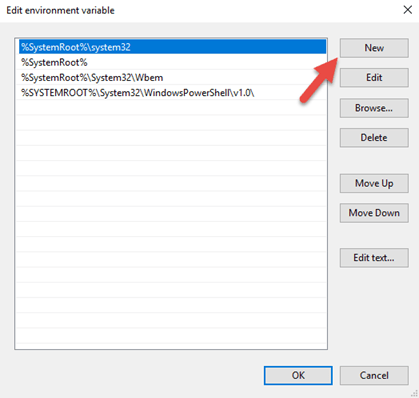
On the Edit environment variable window

10.Select the New button to add a new path

New Environment Variables Window

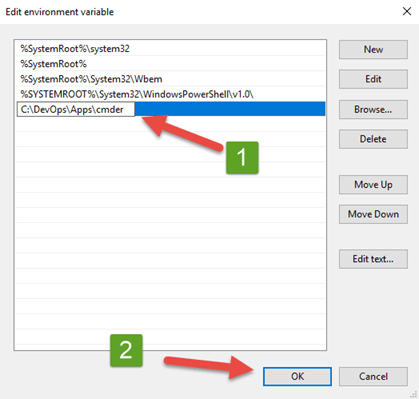
11.Insert the folder path pointing back to the cmder.exe folder path - C:\DevOps\Apps\cmder

12.Click the OK button to add the path and close window

New Environment Variable Window - Adding new path

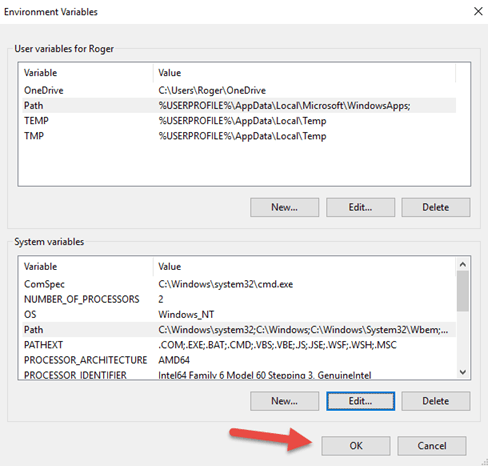
13.Click the OK button to save path update

Environment Variables Window

14.Click the OK button to close the System Properties window

Computer Properties Window

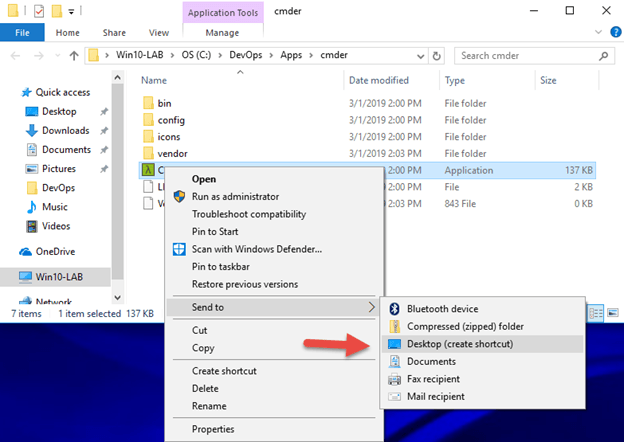
15.Finally, for easy access create a shortcut to the Cmder.exe by using the - Send to Desktop option

Send to Desktop

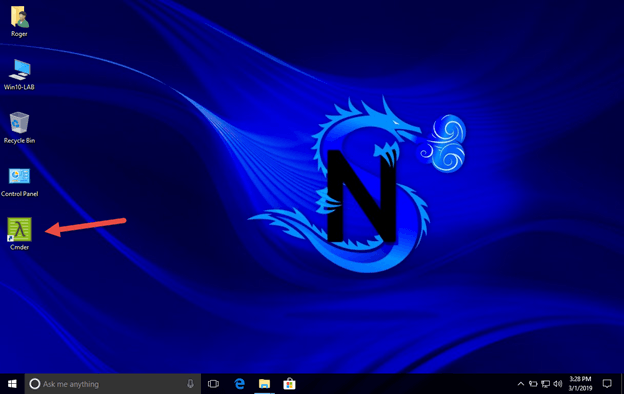
16.So now, let’s check to see if it’s working now double click on the Cmder icon on the desktop

Win10-LAB desktop

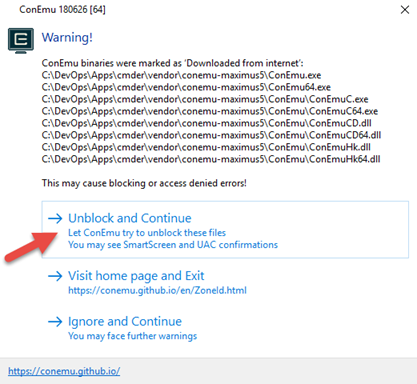
17.Select Unblock and Continue to unblock the files and allow execution of the Cmder.exe

UAC alert

An there you have it, Cmder installed and base configuration completed.

Cmder Console

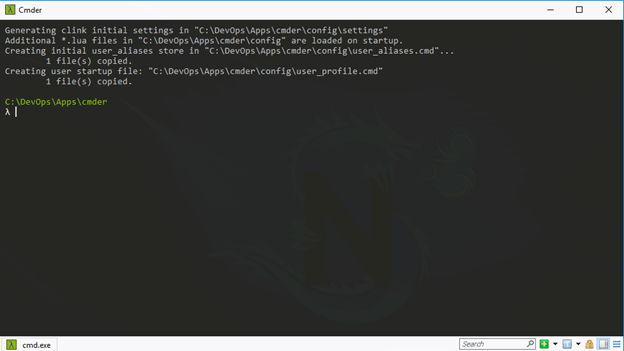
Note - The above window opens the default window Command Prompt

Customized Cmder

Now let’s add a few custom settings to personalize the Win10-LAB environment

18.On the top of the cmder window right click and select Settings

Cmder Console settings

Modify the Console Color Scheme

From the cmder Settings Window

19.In the Choose Color Scheme section, select a color scheme, in my case I chose the Tomorrow Night Blue Color Scheme


Cmder Color Scheme

Customize Environment Shell - PowerShell

Configuring the Admin PowerShell Shell to start in a specified directory is an option I like setting, it enables me to work within a specified Script directory, which I can later add versioning to with Git for Windows.

20.In the Startup section under the Predefined tasks (command groups) , select #6 {Shells::PowerShell (Admin)}


Cmder Start up Directory

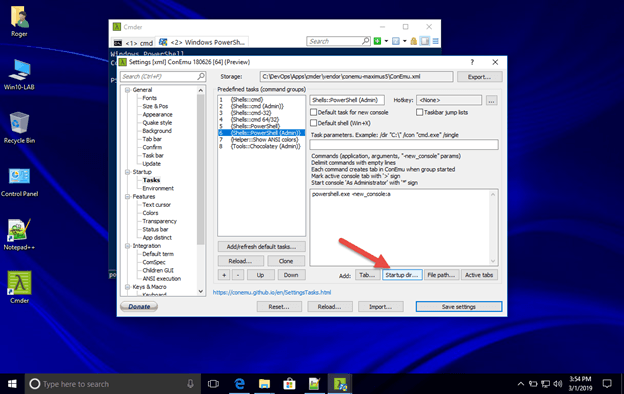
To add a new path for the Default folder

21.Click on the Startup Dir… button

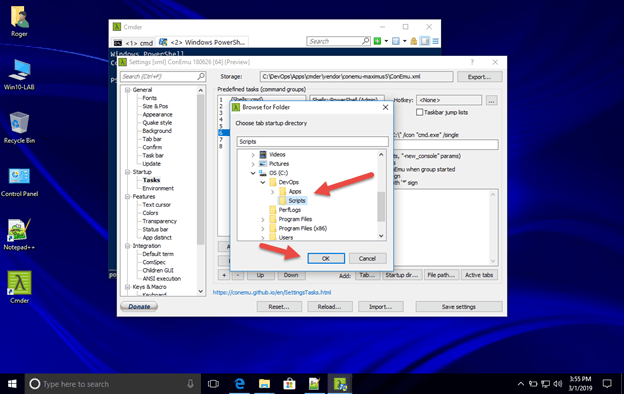
22.Browse to your preferred start up folder - C:\DevOps\Scripts

23.The click the OK button

Start up Directory

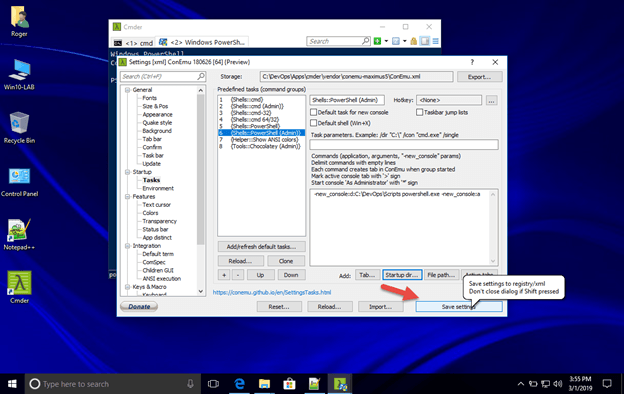
24.To save the configuration click on the Save Settings button

Cmder - Save Settings

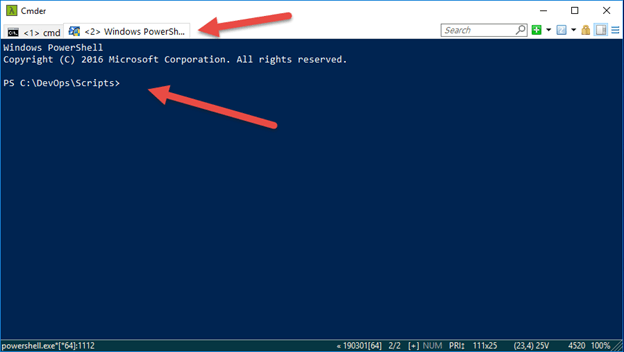
Test PowerShell Window

Now that we have made the changes, let’s see what is looks like

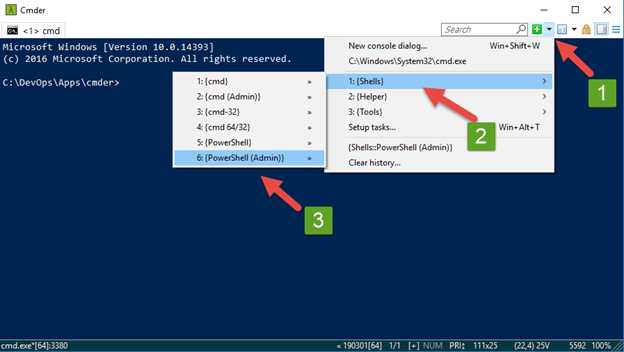
25.Click the Arrow to the right of the search box

26.Then Select - 1: {Shells} , and click on 6: {PowerShell (Admin)}


Cmder PowerShell Shell

27.Click the Yes button to allow the Shell to run in Administrative mode

UAC window

There you go Cmder installed and configured on Windows 10 with the Admin PowerShell shell default start up folder configured.

Cmder PowerShell window

Hope you enjoyed this step by step journey configuring Cmder a very useful DevOps tool for running multiple consoles.

By Roger Taylor July 23, 2024
On Azure Blob Storage
A laptop computer is sitting on top of a blue table next to a server.
By Roger Taylor July 11, 2024
Automating Azure VM Setup with Terraform
By Roger Taylor January 18, 2024
A Deep Dive into Powell Software's Intranet Solutions
By Roger Taylor January 18, 2024
An In-Depth Comparison
By Roger Taylor January 9, 2024
Essential Tips for Successful Cloud Migration
By Roger Taylor January 8, 2024
A Strategic Evaluation for Enhanced Digital Workplaces
By Roger Taylor May 12, 2023
As organizations continue to migrate their workloads to the cloud, the need for efficient and effective financial management of cloud resources is becoming increasingly important. This is where FinOps comes in - a relatively new discipline that is focused on optimizing cloud costs and ensuring that organizations get the best value from their cloud investments. In this article, we will explore the concept of FinOps in cloud computing, its benefits, and best practices for implementing it in your organization. What is FinOps? FinOps is short for Financial Operations, and it is a set of practices and principles that aim to manage cloud costs, optimize spending, and align cloud usage with business objectives. FinOps helps organizations gain better visibility into their cloud spending and provides insights into ways to optimize resource utilization, cost allocation, and resource governance. FinOps is a collaborative approach that involves different stakeholders, including finance, IT, and business teams, to work together to achieve a common goal of optimizing cloud costs while meeting business requirements. Why is FinOps important? As cloud usage grows, so does the complexity and cost of managing cloud resources. Organizations often struggle with tracking usage, forecasting spending, and optimizing costs. This can lead to overspending, unexpected bills, and inefficient resource utilization. FinOps addresses these challenges by providing a framework for cost management and optimization. Here are some of the key benefits of implementing FinOps in your organization: Cost optimization: FinOps helps organizations optimize their cloud costs by identifying areas of waste and inefficiencies and taking actions to reduce them. Improved visibility: FinOps provides better visibility into cloud spending and resource utilization, which helps organizations make informed decisions about resource allocation and capacity planning. Business alignment: FinOps helps align cloud usage with business objectives and priorities, ensuring that cloud investments are aligned with business goals. Increased accountability: FinOps introduces a culture of accountability, where teams are responsible for managing their own cloud usage and costs. Best practices for implementing FinOps Here are some best practices for implementing FinOps in your organization: Collaborative approach: FinOps requires collaboration across different teams, including finance, IT, and business teams. It is essential to establish a culture of cross-functional collaboration to ensure that everyone is aligned with the same goals and priorities. Use of cloud management tools: Cloud management tools provide a centralized platform for managing cloud resources, tracking usage, and optimizing costs. Organizations should invest in cloud management tools that provide visibility and control over their cloud environment. Tagging and cost allocation: Tagging resources and allocating costs to different teams and projects is a critical aspect of FinOps. This helps organizations track usage, understand cost drivers, and optimize resource allocation. Cost optimization strategies: Organizations should implement cost optimization strategies, such as reserved instances, spot instances, and auto-scaling, to reduce costs while maintaining performance. Continuous improvement: FinOps is an ongoing process, and organizations should continuously review and optimize their cloud usage to ensure that they are getting the best value from their cloud investments. Conclusion FinOps is an essential discipline for managing cloud costs, optimizing spending, and aligning cloud usage with business objectives. By implementing best practices for FinOps, organizations can gain better visibility into their cloud spending, improve resource utilization, and optimize costs. As cloud usage continues to grow, FinOps will become an increasingly critical aspect of cloud management, and organizations that embrace it will have a competitive advantage over those that do not.
By Roger Taylor May 11, 2023
As more and more businesses move their operations to the cloud, it becomes increasingly important to implement best practices for securing cloud infrastructure. Amazon Web Services (AWS) is one of the most widely used cloud providers, offering a wide range of services and features. In this article, we'll explore some of the best practices for securing AWS cloud environments. Use Identity and Access Management (IAM) AWS Identity and Access Management (IAM) allows you to manage access to AWS services and resources securely. With IAM, you can create and manage AWS users and groups, set permissions, and enforce Multi-Factor Authentication (MFA) for user accounts. It's essential to implement IAM to ensure that only authorized users can access your AWS resources. Enable Multi-Factor Authentication (MFA) Multi-Factor Authentication (MFA) adds an extra layer of security to your AWS account. By requiring an additional authentication factor beyond a username and password, MFA makes it much harder for hackers to gain access to your account. Enabling MFA for all users and roles is an essential step to securing your AWS environment. Use Virtual Private Cloud (VPC) A Virtual Private Cloud (VPC) is a logically isolated section of the AWS Cloud that you can configure according to your specific requirements. A VPC allows you to create a private network in the cloud and control access to your resources. By using a VPC, you can create subnets, configure security groups, and apply network access control lists to restrict access to your resources. Secure Data in Transit and at Rest Encrypting data is a critical step to ensuring data security in AWS. AWS offers various encryption options for data in transit and at rest, including HTTPS, SSL/TLS, S3 encryption, and AWS Key Management Service (KMS). By encrypting your data, you can ensure that even if someone intercepts your data, they won't be able to read it. Monitor and Audit Your Environment Monitoring and auditing your AWS environment is essential to identifying potential security threats and vulnerabilities. AWS offers several tools for monitoring and logging, such as AWS CloudTrail, AWS Config, and Amazon GuardDuty. These tools can help you monitor activity on your account, identify security breaches, and maintain compliance with regulatory requirements. Keep Your Software and Operating Systems Up-to-Date Keeping your software and operating systems up-to-date is crucial to maintaining the security of your AWS environment. AWS offers several tools to automate the process of patching and updating, such as AWS Systems Manager and AWS Inspector. By keeping your software and operating systems up-to-date, you can ensure that any known security vulnerabilities are patched and that your environment is protected against the latest threats. Regularly Test Your Environment Regularly testing your AWS environment is critical to identifying potential security threats and vulnerabilities. AWS offers several tools for testing your environment, such as AWS Config Rules and Amazon Inspector. By regularly testing your environment, you can identify any security gaps or misconfigurations and address them before they become a problem. In conclusion, securing AWS cloud infrastructure requires a combination of tools, processes, and best practices. By following these best practices, you can ensure that your AWS environment is secure, compliant, and protected against potential security threats. Implementing these best practices is essential to maintaining the security of your AWS environment and ensuring that your business remains protected in the cloud.
By Roger Taylor May 11, 2023
As more businesses move their applications and data to the cloud, securing cloud infrastructure becomes increasingly important. Microsoft Azure is one of the most popular cloud platforms, providing a wide range of services and features for running applications, storing data, and managing infrastructure. In this article, we will discuss some best practices for securing Azure cloud. Identity and Access Management (IAM) IAM is critical to securing any cloud infrastructure, including Azure. It involves managing user accounts, access policies, and authentication methods. In Azure, you can use Azure Active Directory (AAD) to manage user accounts and access policies. AAD allows you to implement single sign-on (SSO) and multi-factor authentication (MFA) for all users accessing the Azure environment. Encryption Encryption is a critical security measure that ensures that data is protected from unauthorized access. Azure provides a variety of encryption options, including encryption at rest and in transit. To ensure that data is encrypted, you should use Azure Disk Encryption to encrypt virtual machines and Azure Storage Service Encryption to encrypt storage accounts. You can also use Azure Key Vault to manage encryption keys securely. Network Security Network security is essential to securing Azure cloud. You can use Azure Virtual Network (VNet) to isolate your cloud resources and control network traffic. You can also use Network Security Groups (NSG) to create rules that allow or deny traffic to and from specific resources. Azure also provides features like Azure Firewall and Azure DDoS Protection to protect against network attacks. Monitoring and Logging Monitoring and logging are essential for identifying security threats and detecting potential breaches. Azure provides several tools for monitoring and logging, including Azure Security Center, Azure Monitor, and Azure Log Analytics. These tools allow you to track system events, identify threats, and respond quickly to security incidents. Compliance Compliance is essential for businesses that handle sensitive data or operate in regulated industries. Azure provides several compliance certifications, including HIPAA, PCI DSS, and ISO 27001. To ensure that your cloud infrastructure is compliant, you should regularly review Azure compliance reports and audit logs. Disaster Recovery Disaster recovery is critical for ensuring business continuity and preventing data loss. Azure provides several disaster recovery options, including Azure Site Recovery, Azure Backup, and Azure VM replication. These tools allow you to replicate data and applications to different regions or data centers, ensuring that your business can continue to operate even in the event of a disaster. In conclusion, securing Azure cloud requires a comprehensive approach that includes identity and access management, encryption, network security, monitoring and logging, compliance, and disaster recovery. By implementing these best practices, businesses can ensure that their cloud infrastructure is secure and protected from potential security threats.
By Roger Taylor May 11, 2023
As organizations look to leverage the benefits of cloud computing, many are considering a multi-cloud architecture that combines the capabilities of multiple cloud providers. Two of the leading providers in the cloud space are Microsoft Azure and Amazon Web Services (AWS). When designing a multi-cloud architecture with Azure and AWS, there are several best practices that organizations should follow. Understand the strengths and weaknesses of each cloud provider. Before designing a multi-cloud architecture with Azure and AWS, it's important to have a clear understanding of each provider's strengths and weaknesses. Azure is known for its strong support for enterprise workloads and its wide range of services, including machine learning and AI capabilities. AWS, on the other hand, is known for its scalability and flexibility, as well as its extensive suite of tools and services. By understanding these strengths and weaknesses, organizations can design a multi-cloud architecture that leverages the unique capabilities of each provider to meet their specific needs. Design for interoperability One of the key challenges of designing a multi-cloud architecture is ensuring that different cloud services and resources can work together seamlessly. To achieve this, it's important to design for interoperability. Both Azure and AWS support a variety of open standards and APIs, which can help ensure that services can be integrated across multiple clouds. In addition, it's important to use tools and services that are designed to work across multiple cloud environments, such as Kubernetes for container orchestration or Terraform for infrastructure as code. Leverage cloud-native services To get the most out of a multi-cloud architecture, it's important to leverage cloud-native services that are specifically designed to work with each cloud provider. For example, Azure offers services such as Azure Functions and Azure Cosmos DB, while AWS offers services such as Amazon Lambda and Amazon DynamoDB. By leveraging these services, organizations can take advantage of the unique capabilities of each cloud provider while still ensuring interoperability and a consistent user experience across multiple clouds. Use consistent management and monitoring tools. Managing a multi-cloud architecture can be complex, which is why it's important to use consistent management and monitoring tools across all clouds. Both Azure and AWS offer their own management and monitoring tools, but organizations may also want to consider third-party tools that can work across multiple clouds. By using consistent tools, organizations can ensure that they have a single view of their entire cloud infrastructure, making it easier to manage and monitor resources and detect issues before they become major problems. Ensure data security and compliance. Finally, it's important to ensure that data is secure and compliant across all clouds in a multi-cloud architecture. This requires a comprehensive approach to security that includes data encryption, access control, and monitoring. Both Azure and AWS offer a variety of security tools and services that can help ensure data security and compliance. In addition, organizations should also develop a comprehensive security and compliance strategy that considers the unique requirements of each cloud provider and the specific workloads that will be running on each cloud. In conclusion, designing a multi-cloud architecture with Azure and AWS can provide organizations with the flexibility and scalability they need to support their workloads. By following these best practices, organizations can design a multi-cloud architecture that leverages the strengths of each provider while ensuring interoperability, consistent management and monitoring, and data security and compliance.
Show More
Share by: